Thinking about starting a blog? Excellent decision. I think every person should be blogging for three reasons:
- Platform for influence
- Increases your opportunities, relationships, and income
- Helps you improve your overall communication as a person (which helps you in your relationships & career)
The goal of this post is to walk you through setting up your own self-hosted WordPress blog (i.e. JohnDoe.com – NOT JohnDoe.wordpress.com) in less than 10 minutes. Don’t worry if you’re not ‘tech-savvy’ – that’s okay. I’ve included step-by-step instructions below, as well as a video and checklist to help make this process as easy as possible.
I want to take away the confusion and make this process painless, simple, and fast. If you watch the video below, or follow the written steps, you will have your own self-hosted blog up and running on your own domain in less than 10 minutes.
When I got started blogging, there really wasn’t any online tutorials, and setting up a self-hosted blog was super confusing to me. I bought two books from Barnes & Noble to help make the process easier, but it was still challenging. Eventually, I got it – after three hours of work.
Remember: Even if you’re not tech savvy (like I used to be), this post will make the process incredibly easy. Don’t be afraid to get started.
Here’s a breakdown of the total costs:
- Domain = FREE
- Hosting = $5.95 per month ($71.40 per year)
- Blog theme = FREE
Let’s get started!
You can either follow the steps by watching the video or reading the steps below. Be sure to download the checklist so you can have it for reference, too.
Click here to download setup checklist
Step 1: Choose the Starter hosting package with Bluehost
First, we are going to go to Bluehost, click ‘Get Started Now’, and choose the Starter package. Web hosting is what puts your website on the Internet. You’ll pay an annual fee for this, around $75-100 dollars a year. With Bluehost, you’ll only pay $71.40 (plus, you’ll get a free domain for the first year included. Usually, domains cost $10-15 per year).
Action step: Go to Bluehost, click ‘Get Started Now’, then choose the Starter plan.

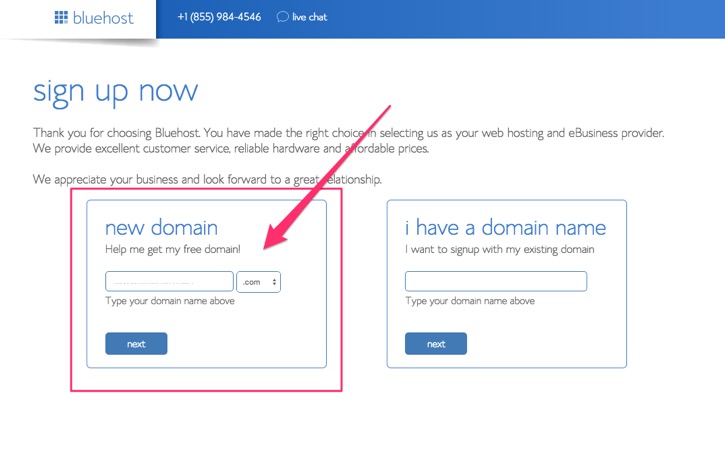
Step 2: Choose your domain and sign up with Bluehost
If you need help deciding on a domain name, check out this post. I recommend using your own name (if it’s available) with a .com (i.e. JohnSmith.com). If you want to brainstorm domain ideas and see their availability, I recommend using the free tool namevine. Don’t spend too much time here; you can always change your domain name later.
After you’ve entered your domain, continue filling out all the information required by Bluehost. You can go with three years for $3.95 per year (if you can afford it, and definitely see yourself blogging for years to come), or you can go with the 12 month $5.95 plan (paying for one year at a time) if you just want to test blogging out to see if it’s right for you.
Under ‘Package Information’, I would uncheck all of those options for right now. You don’t really need any of those extra features right now. (If you want extra privacy, the only one of those features I would check is ‘Domain Privacy Protection.’ This hides your name and billing address from public visibility, so that people and companies can’t look up your domain information and spam you.)
Click ‘Submit’, and move on to step 3. You’re almost done! Nice job.
Action step: Enter your domain, and submit your remaining information to Bluehost to complete your account setup.
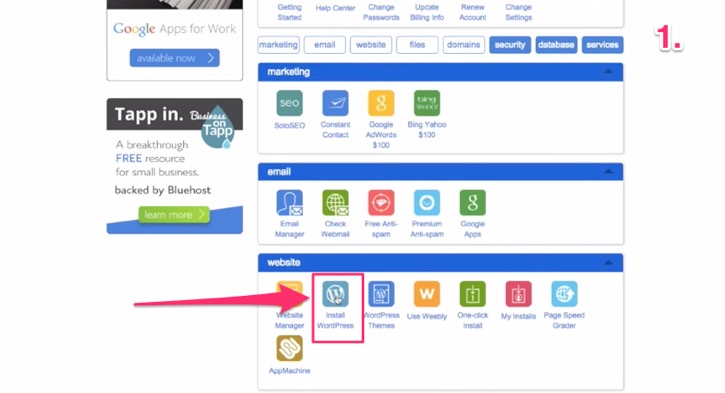
Step 3: Install WordPress
After you’ve completed sign up, you’ll be taken to your cPanel. You’ll need to install WordPress. WordPress is a free, open source blogging software that makes it incredibly easy and fun to write and publish online. Thankfully, Bluehost makes the WordPress installation process incredibly easy – it’s literally a one click install.
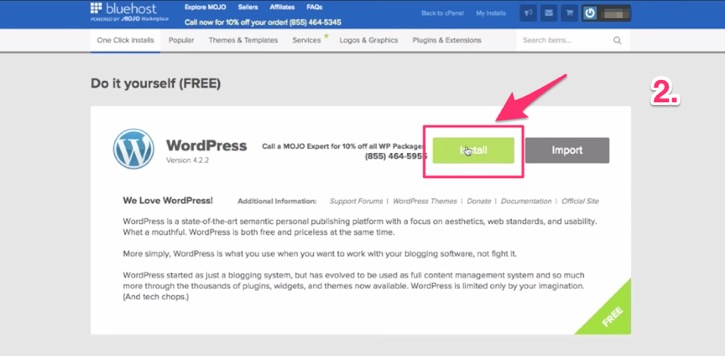
After this, you will have the option to install WordPress on the root domain (i.e. www.JohnDoe.com) or a subdirectory (i.e. www.JohnDoe.com/blog). The choice is up to you, but if you are just getting started, I recommend keeping it simple and installing it on the root domain. Click ‘Check Domain’ to get started.
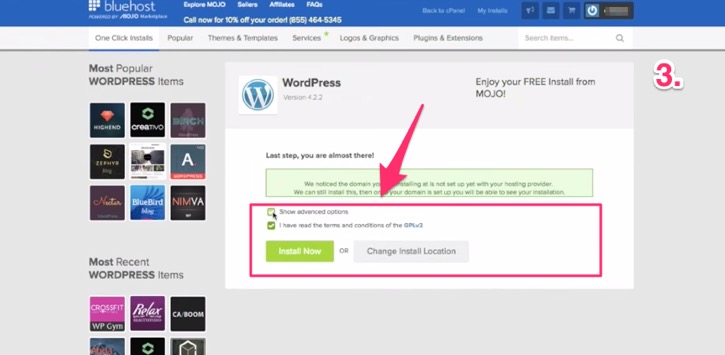
Check both boxes, and a form will appear. Change your site’s name, admin username, and admin password to whatever you’d like. IMPORTANT: You will need this admin username and admin password to log into your website, so make sure you write them down somewhere safe and secure (in a place that you’ll remember).
Then, click ‘Install Now’ and wait for WordPress to install (this could take a few minutes, so be patient).
After the install is complete, click ‘View Credentials’ and then click ‘View’ (underneath Action). After you’ve done so, you should see a screen like this:
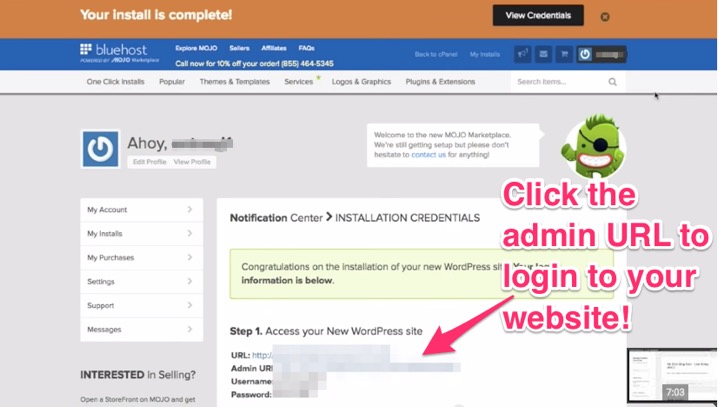
Congrats! If you’ve made it this far you are practically done. You just need to login to your website and write your first blog post. Click the ‘Admin URL’ link to get started (remember to write down your Username and Password!).
Step 4: Log into WordPress and write your first blog post!
Great job! You are just about finished. Now, we just need to log into our WordPress website and write our first post.
After you’ve clicked the admin URL, you should see this screen:
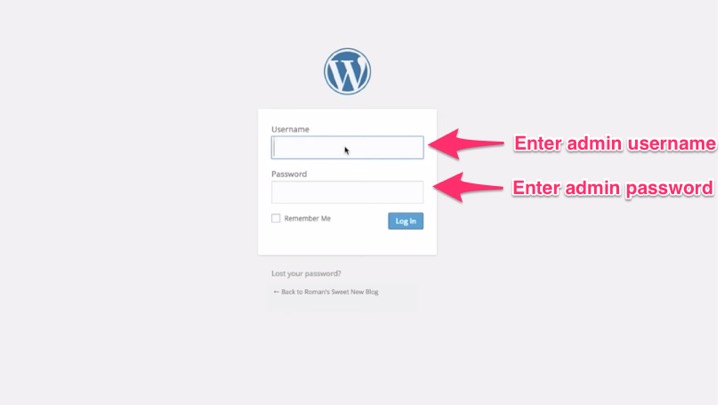
IMPORTANT: I would bookmark this page and/or memorize the URL (it will be something along the lines of: www.yourdomain.com/wp-admin). In the future – when you write and publish blog posts, add new themes and plugins, and make other tweaks – you will login this same way to do so.
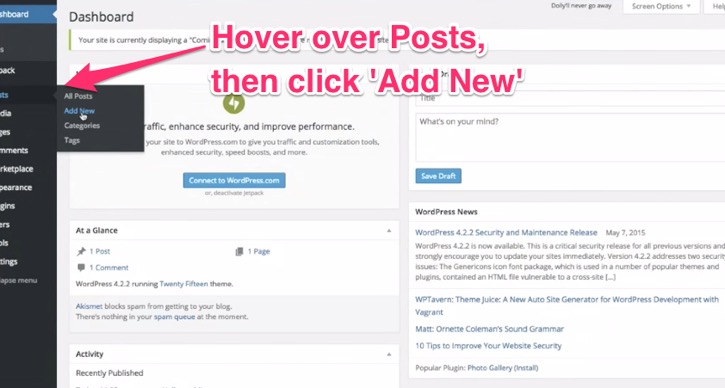
Once you are logged in, you should see a similar screen to the one the below screenshot. This is your ‘dashboard’. The right side is your menu. Hover over posts and click ‘Add New’ to start writing your first blog post.
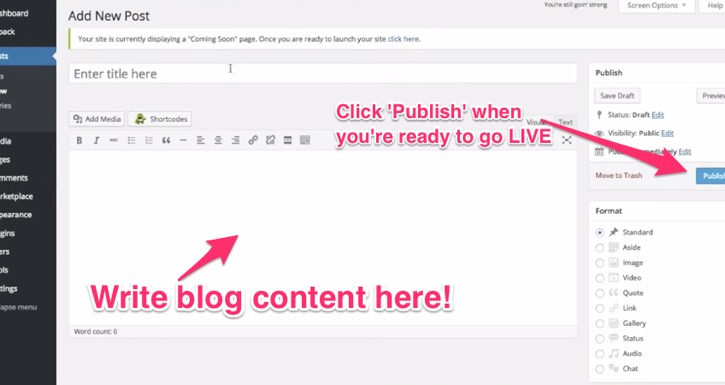
Enter your title and write the content of the article in the main section. When you are ready, click ‘Publish’ to make your post live! (Don’t worry, you can always change/update your blog post later on.) If you’d like to save and return to writing later, just click ‘Save Draft’.
After you’ve clicked publish, open up a new tab, type in your blog domain (i.e. www.JohnDoe.com), and view your blog. You should see your blog post that you just wrote and published at the top.
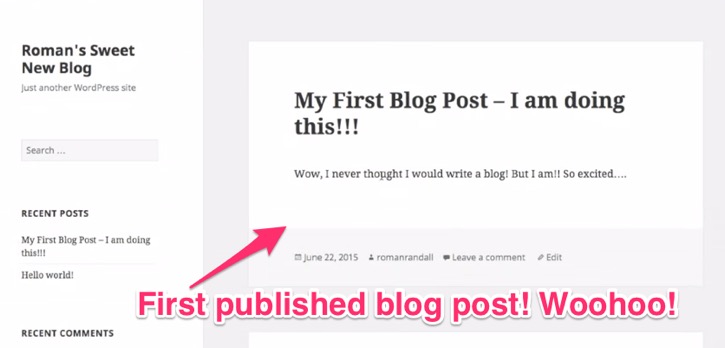
And there you go! You’ve just started your own blog and published your first blog post. Well done!
Conclusion
Congratulations! You just setup your own self-hosted WordPress blog. Way to go! Sure, there’s a lot more to learn from here, but you’ve taken a step most people don’t: you’ve started.
Keep taking action, learning, and improving. Try to get into a writing habit and publish at least once a week. To learn more about WordPress – and to stay motivated as a writer and blogger – check out these resources:
- How To Influence People While Your Alive And Dead
- Join our free email newsletter for more tips and motivation
- Read WPbeginner.com, ProBlogger, and goinswriter.com
If you’d like to shop/purchase a premium WordPress theme, I recommend you check out StudioPress and ThemeForest.
Questions? Stuck? Leave a comment below and we’ll do our best to help you out.
###
thanks Roman. I am going to get started on this today. I just needed to read through the instructions again. Hope you and Abbie are doing well. Take care, Peg
Glad to hear that! :) Feel free to email me with any questions you have along the way. Hope you are well, too!